For today’s Quilt Along lesson, we will tackle basting which is usually the least fun part of making a quilt. However, I’m giving you a whole week to do it and it only took me 2 hours including ironing and lots of pinning!
Step 1 – Give your top and backing a final pressing (30 Minutes)
This is the first time I have used starch on a quilt throughout the entire process and I loved it! Not only did I press all of my seams open, I starched the completed top and back.
This really made the top lie flat and made it easier to baste. When starching the top for the final pressing, I only starched the back side, waited a few minutes to let the starch soak in, and went over every seam with my iron. Just take a look at the before and after pics to see what a difference pressing with starch makes.
Step 2 – Lay Out The Quilt Sandwich (15 Minutes)
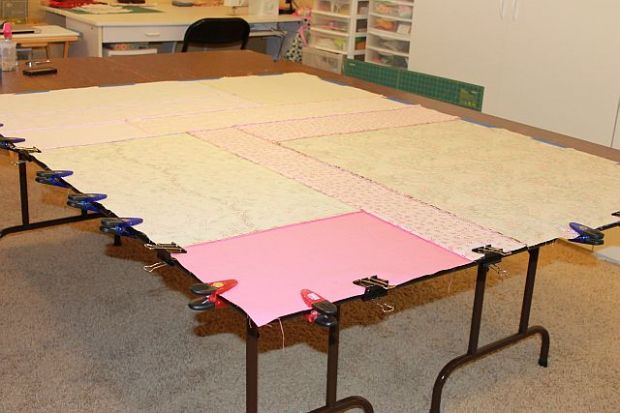
Use a large flat surface to lay out your quilt. I have 2 long banquet tables that I purchased from an office supply store. I leave them up in my sewing loft all the time and use them as my cutting area, too. Before I got these tables I used to baste on my wooden kitchen table.
I use binder clips to secure two edges of the table and painter’s tape to secure the other two edges. You want the backing to be secure but not overly tight. If you have just one table to work with, secure the middle of the quilt, baste it, and then move on to the rest of the quilt, pinning one section at a time.
Next, add your layer of batting and smooth it out and look for any stray threads. Then add your quilt top. I don’t secure either of these two layers – just the backing.
Step 3 – Pin Basting (1 Hour, 15 Minutes)
I have learned that the key to good basting is using lots of pins! I start out by sprinkling a few safety pins on one side of the quilt. I leave them open after removing them from my previous quilt so they are already open, ready to be pinned.
I divide the quilt into 4 areas and completely baste one section at a time. I put all of the pins into the quilt sandwich first, then go back and close them all. A band-aid really comes in handy on my index finger to protect it and help close the pins.
I used a variety of pins – some large, some small, some straight, some bent – whatever I had on hand. I pinned every other square.
After pinning the entire quilt, I trimmed off the excess batting and backing fabric so there’s only an inch or two around all sides. The less fabric under the machine, the better!
Hugs ‘n Kisses Quilt Kits are available for purchase while supplies last. If you have any questions about this week’s homework, please be sure to join my flickr discussion, leave a comment, or email me directly at christa@christaquilts.com.
Quilt Along Schedule – Links will go to each active post when published.
- 5.1 – 2/27/13 Supply List
- 5.2 – 3/6/13 Choosing Fabrics and Layouts
- 5.3 – 3/13/13 Cutting and Sewing the Bow Ties
- 5.4 – 3/20/13 Sewing the X and O Blocks
- 5.5 – 3/27/13 Finishing the Top and Borders
- 5.6 – 4/3/13 Piecing the Backing
- 5.7 – 4/10/13 Pin Basting
- 5.8 – 4/17/13 Stitching in the Ditch
- 5.9 – 4/24/13 Decorative FMQ
- 5.10 – 5/1/13 Additional Quilting
- 5.11 – 5/8/13 Binding – It’s Finished!
Grab my Quilt Along button!
<div align="center"><a href="http://christasquiltalong.com" title="Christa's Quilt Along" target="_blank"><img src="https://christaquilts.files.wordpress.com/2013/03/christas-quilt-along-175-2.png" alt="Christa's Quilt Along" style="border:none;" /></a></div>


Any tips for making sure the quilt top is squared when pinning the top? I sometimes cut backing with square corners and then measure in from all sides of quilt to ensure quilt top is even distance away. Not sure if there’s a better or faster way. Any visuals would help.
Thank you.
Cindy
Ditto on “Ellie says”! I just pinned a full sz quilt really fast w/my grapefruit spoon!!!
I’m up to date , thank you so much for your clear & precise instructions. I fell in love with your version but I will make another one with a different jelly roll in the original X & O version.
Use a cheap grapefruit spoon to close the safety pins. They have ragged edges and save your fingers.
Go to http://www.patchworks.com/fingertips.htm and get a Kwik Klip. I couldn’t pin a quilt anymore without it.